How to use a drill the right way

A drill is essential for many home improvement projects, but where do you start if you don’t know how to use one? I’ve got you covered! With this easy-to-follow guide, you’ll learn everything you need to know, from understanding the parts of a drill to adjusting its settings. I’ll also walk you through how to drill holes and drive screws so that your next project will be a success.
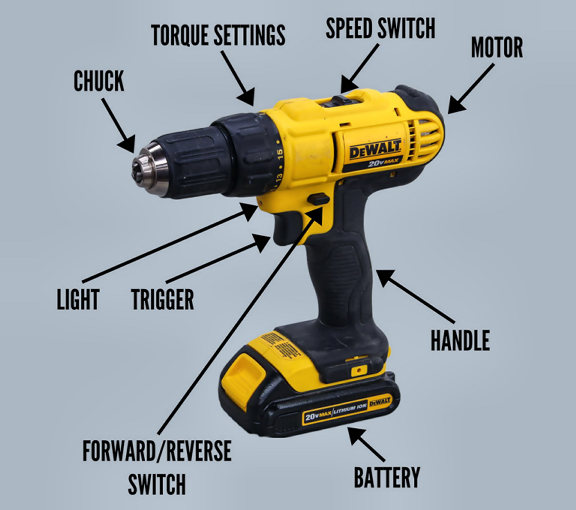
Before you start using a drill, there are several parts you’ll want to be familiar with.

Handle or Grip
The handle or grip is the part of the drill you hold onto while drilling. It’s usually made from hard plastic or rubber and has grooves or indentations to help provide a good grip.
Motor
The motor is what powers the drill. It’s located above the handle and is responsible for turning the chuck, which spins the bit.
The size of the motor will vary depending on the type of drill you have. A corded drill will typically have a higher-powered motor than a cordless one.
Chuck
The chuck is a clamp that holds bits in place. A drill’s chuck has adjustable jaws, making it easy to change between bits of different shapes and sizes, such as round shank bits and hex shank bits.
Chucks come in two styles: one with a key and one without. The first is a keyed chuck, which needs a chuck key to tighten and loosen.
The second is a keyless chuck that does not need a key. All you need to do is turn the chuck clockwise to tighten it and counterclockwise to loosen it.
A keyed chuck has more gripping strength than a keyless one, and it’s commonly found on bigger, more powerful drills.
Forward/Reverse Switch
The forward/reverse switch or button is used to change the direction of the bit.
The forward direction rotates the bit clockwise, which is used for drilling holes and driving fasteners.
The reverse direction rotates the bit counterclockwise, which is used for removing screws and drill bits.
Trigger
The trigger is the part you press to start the motor and turn the drill bit.
Some drills have a variable speed trigger. A variable speed trigger controls the speed of the drill by allowing you to start at low speeds and gradually increase the speed.
For example, if you were drilling a hole in a piece of wood, and you started the drill too quickly, it might tear the wood fibers causing damage to your workpiece. The variable speed trigger allows you to gradually increase the speed rather than suddenly starting at full speed.
Clutch/Torque Settings
A slip clutch with torque settings is a common feature on many drills. Torque is the amount of twisting force the drill can apply to a bit.
The clutch allows you to adjust the torque, so you don’t over-tighten screws or drive them too deeply into the workpiece.
When the drill meets a specific amount of resistance, the clutch slips or disengages, stops turning, and makes a clicking sound.
High/Low Speed Switch
A drill typically has two speeds, high and low.
The higher the speed, the lower the torque, which is best suited for drilling holes.
The lower the speed, the higher the torque, which is used for more delicate tasks such as driving screws and other fasteners.
Rechargeable Battery or Corded
The majority of drills today are powered by a rechargeable battery. There are also some drills that can be plugged into an electrical outlet and used with a power cord.
LED Light
Many drills have an LED light, which is helpful when drilling in dark or confined spaces. The light illuminates the surface you are drilling, allowing you to see clearly, and enabling more accurate drilling.
